Learning Objective
The objective of this SQL Server tutorial is to teach you how to enable a disabled index associated with a table or view.
Introduction to SQL Server Enable Index
An index is often disabled during bulk updates or to check the performance of the queries on the table without the index so as to determine its efficacy and need. After the operation or evaluation, it has to be reenabled again. However, it is not possible to simply enable a disabled index. To enable the index and bring it back into operation it has to be rebuilt so that it can account for the changes that happened in between and bring itself up to date. Therefore, the command to enable an index is REBUILD.
Operation
An index is enabled using the REBUILD command. It is possible to enable one index at a time or all the indexes associated with a table or view in one go with a single command. There are quite a number of ways in which a disabled index can be rebuilt. One way is using the ALTER TABLE statement, another way is using the CREATE TABLE statement and a final way is using the database consistency checker (DBCC) tool. The syntax for all the mentioned options is discussed below with examples.
SQL Server Enable Index Syntax
a) ALTER INDEX syntax
The basic syntax of the command to enable an index using ALTER TABLE is as follows.
ALTER INDEX index_name
ON [table_name|view_name]
REBUILD;
The basic syntax of the command to enable all indexes on a table or view using ALTER TABLE is as follows.
ALTER INDEX ALL
ON [table_name|view_name]
REBUILD;
b) CREATE INDEX syntax
The basic syntax of the command to enable an index on a table or view using CREATE TABLE is as follows. As can be seen from the syntax the CREATE TABLE statement basically drops and re-creates the index freshly with the help of the DROP_EXISITNG=ON option. It is also evident that you cannot enable all indexes on a table or view at the same time using this command but only one index at a time.
Please keep in mind that the default clustered index cannot be enabled using the create index syntax. The create index syntax can only be used to enable additional non-clustered indexes on a table or view.
CREATE INDEX index_name
ON table_name|view_name
WITH (DROP_EXISTING=ON);
c) DBCC syntax
The basic syntax of the DBCC command to enable an index on a table or view is as follows.
DBCC DBREINDEX (table_name|view_name, index_name);
The basic syntax of the DBCC command to enable all indexes on a table or view is as follows.
DBCC DBREINDEX (table_name|view_name, '');
SQL Server Enable Indexes Examples
Let us consider a table called students in the database. The table contains basic student information including student name, roll number and stream of study. The table is represented below. The rollno column is the primary key column.
| rollno | firstname | lastname | stream |
| 11 | Amy | Williams | Arts |
| 13 | Laura | Wells | Science |
| 23 | Rizwan | Ahmed | Commerce |
| 25 | Nick | Jones | Science |
| 29 | Michael | Bull | Science |
| 30 | Val | Kostner | Science |
| 33 | Wayne | John | Commerce |
| 35 | Julie | Summers | Arts |
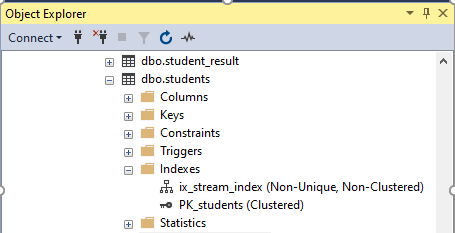
The table has indexes associated with it. We can see the indexes in the screenshot taken from SQL Server Management Studio (SSMS) below. It has a default clustered index on the primary key rollno and an additional non-clustered index on the stream column.

The same can also be checked using the SP_HELPINDEX system stored procedure.
EXEC SP_HELPINDEX students;
| index_name | index_description | index_keys |
| ix_stream_index | nonclustered located on PRIMARY | stream |
| PK_students | clustered, unique, primary key located on PRIMARY | rollno |
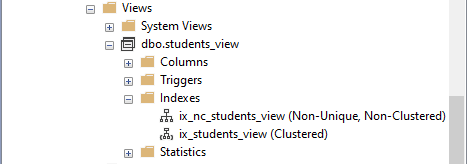
It also has a view called students_view which has 2 indexes defined on it as can be seen in the figure below. One of them is a clustered index and another a non-clustered index.

All the above-mentioned indexes are disabled. With the help of the above sample scenario we will see the index enable operation in action.
1) Enabling a single Index
In this first example we will enable the clustered index associated with the students table. Before that we will run a SELECT query on the table to check and ensure that the index is disabled. Below is the SELECT query execution and its output which shows that the query processor failed to run the query which is the normal behavior when the default clustered index on a table is disabled.
SELECT * FROM students;

Msg 8655, Level 16, State 1, Line 1
The query processor is unable to produce a plan because the index 'PK_students' on table or view 'students' is disabled.
Completion time: 2020-09-28T21:30:31.5493724+05:30
The disabled index can be enabled through any of the below queries. The first query uses the ALTER TABLE syntax and the second query uses the DBCC syntax.
a) ALTER INDEX example
ALTER INDEX PK_students
ON students
REBUILD;
b) DBCC example
DBCC DBREINDEX (students, PK_students);
After enabling the index, we can check whether it has been enabled by running the select query. The SELECT * query will execute successfully and return all table rows.
c) CREATE INDEX example
For the create index example we will use the disabled nonclustered index ix_stream_index and enable the same. This is because of reason already mentioned above in CREATE INDEX syntax explanation.
CREATE INDEX ix_stream_index
ON students (stream)
WITH (DROP_EXISTING=ON);
2) Enabling All Indexes on a Table
In this example we will enable all the indexes on the view. The first example below uses the ALTER statement to do the same.
a) ALTER INDEX example
ALTER INDEX ALL
ON students_view
REBUILD;
b) DBCC example
The following command will achieve the same result using DBCC.
DBCC DBREINDEX (students_view, '');